Creating engaging portraits is easy when you consider these five key stepsPhotographing people can be extremely rewarding. There’s enormous pleasure in capturing an engaging portrait, not just for the photographer, but for the subject and the viewer too.
The great thing is that the art of portraiture is one that is relatively simple to master, yet there are a few pitfalls you may encounter that mean your people pictures aren’t up to scratch. To avoid the common mistakes that many photographers make, consider these five key things and take your portraits to the next level.
Lighting
For the most flattering portraits you’ll want to use soft lighting. Not only does it make skin appear more smooth, but the gentle gradation between highlight and shadow is less distracting to the viewer. To use soft light in your portraits you need to avoid harsh light sources such as the direct sun or your camera’s built-in flash.
One of the best sources of soft lighting is to use the light coming through a window. This will produce a flattering look for any subject and you can easily control the exposure so the rest of the room falls away into shadow. In the northern hemisphere you’ll get the brightest illumination from any south facing window, meaning you can use a lower ISO and protect image quality. If the sun is directly shining through the window, then you can soften the light by hanging a patternless net curtain in the window.
You can create beautifully soft lighting simply by facing your subject towards a window
If you’re shooting portraits outdoors on a sunny day, you’ll get the best results if your subject is facing away from the sun. Not only will you avoid any harsh and distracting light casting unflattering shadows on your subject’s face, but the light from the sun will add highlights to the air and help create separation from the background. To help brighten the face and add a catchlight to the eyes, you should use a reflector to bounce light back towards your model. Reflectors are a really useful and affordable accessory, but if you don’t have one you can use a large piece of white card to throw light back onto your subject.
Use a reflector to bounce light back towards your subject
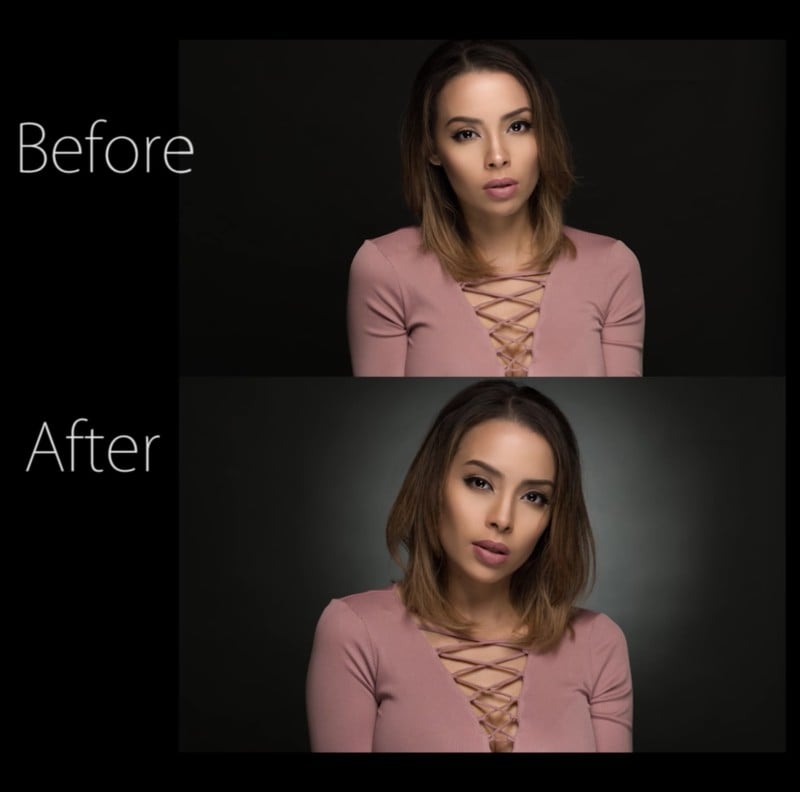
Another way to create soft lighting but with more control is to use off camera flash and a light modifier like a softbox or shoot through umbrella. You’ll need a flashgun, a pair of wireless triggers, a lightstand and your chosen modifier, but with this setup you can create professional looking portraits at any location. You don’t need to rely on the sun, and you can position your soft light source anywhere around your subject to create a range of powerful effects.
You can achieve pro looking results by using off camera flash and a softbox
Camera settings
The cornerstone of a really engaging portrait relies on a shallow depth of field. This helps to blur the background, focusing attention towards the subject and minimising any distractions. The easiest way to take control of the depth of field in your images is to shoot using Aperture priority (A or Av on your camera’s mode options). In this mode, you select the aperture setting and your camera takes control of the shutter speed to deliver a balanced exposure. To create a nice soft and blurry background you need to set your f/number to its lowest setting. On a standard kit lens this can be anywhere between f/3. 5 - f/6. 3, depending on the make and model. The lower the f/number the more background blur you’ll achieve, and more professional lenses offer aperture settings of f/1. 8, f/1. 4 or f/1. 2, but at these extreme settings it can be more difficult to accurately focus.
Set your camera to aperture priority to control the depth of field
The focal length of your lens also has an impact on how blurry the background of your portrait is. With a wide angle lens it’s difficult to achieve a pleasing background blur, but longer focal settings create more compression, emphasising the blur. Many photographers find the 50mm f/1. 8 is an ideal portrait lens, and is a great option when expanding your kit as it’s a versatile and affordable optic.
Focusing
To help your portrait instantly connect with the viewer you need to set the focus so the eyes are the sharpest part of the image. As people ‘sit’ for a portrait, your subject will be static and so you should use your camera’s more accurate single focusing mode. On a Nikon this is ‘AF-S’ and on a Canon it’s called ‘One Shot’; other manufacturers do vary so you may need to check what it’s called on your camera. With this focusing mode selected simply adjust your camera’s active AF point so that it hovers over your subject’s nearest eye. You can do this either with your camera’s D-pad or sub-selector dial. Once the active AF point is in place, half press the shutter button to set the focus; the AF point will usually flash in red and your camera may emit a beep to tell you the focus is set. With this done, you’re ready to fully press the shutter button to take the shot. Inspect the results on screen to make sure you've set the focus as accurately as possible.
Set your camera to its single focusing mode, and focus on your subject's nearest eye
Composition
To add more impact to your image you need to make sure you compose your portrait correctly. Too often many people make mistakes by leaving too much room above the head, instead you want to frame up so that the eyes appear in the upper third of your frame. If your subject isn’t directly facing the camera, but is instead positioned more towards one side, then you need to ensure there is more space in front of them, than there is to their rear. The space they are facing is known as the ‘active space’, and portraits nearly always work better when the subject is slightly to one side, facing towards this active space. If there is more space behind your subject than there is in front of them, then this can lead to a more claustrophobic and less balanced feel to the image.
Compose so the eyes sit near the upper third of the frame
Expression
Each portrait is capable of telling a story, so consider the impact your subject’s expression will have on the image. For really engaging portraits you need to make sure your subject is feeling at ease in front of the camera. Some people struggle when having their picture taken and can feel self-conscious; this never makes for a good picture so it’s your job as the photographer to ensure they are relaxed. Decide what the mood of your portrait should be, a natural laugh will produce a genuine smile full of warmth and positivity. Alternatively you could opt for something more thoughtful and introspective by asking your subject to look into the middle distance and maintain a more neutral expression. A more sombre expression and direct eye contact can create a really powerful portrait that instantly engages the viewer. After taking a few shots it’s a good idea to show your subject the results on the back of the camera, this way they’ll become more confident and understand how to adjust their pose to create better results.
Getting your subject to look into the lens helps make a connection with the viewer
Ensuring your subject is relaxed will make for more confident expressions
. digitalrev.com2017-7-28 03:00